Tips for Building Infrastructure in CloudFormation
- Published
Here's some general tips for improving your workflow when building infrastructure with AWS CloudFormation. This page assumes you've already picked up some of the basics of CloudFormation. If you haven't, the Getting Started guide and a bit of practice is a good place to start.
Get comfortable with the CloudFormation web console. Then use the command line for quick stuff.
As with any AWS service: if you don't know how it works, just use the web console for a while. This will help you figure out the service's intended use and makes visualising how it works much easier. The same goes for using CloudFormation: the console is the easiest way to visualise the creation of resources and flow of events in response to changes you make.
Once your're a bit more comfortable, however, iterating on stacks (as I'll mention below) becomes much faster when you weave the command line interface into your workflow. Deploying a stack update becomes as simple as copy-pasting a command instead of clicking through the update wizard.
I still use the web interface all the time. I tend to have a command line and web console open side by side, quickly deploying a stack from the command line and watching the changes (and failures) come through the web console.
Make small changes and deploy often
This is a good principal in all software engineering generally, but the reasoning for why with CloudFormation is slightly different. CloudFormation will tell you exactly where you made a mistake in your template, but certain problems can only be encountered as CloudFormation goes along creating Resources. It can't fully validate everything before it starts. This means you can get quite a way into a stack deployment before something breaks. Leaving the system in a halfway state is worse than failing to create an incorrectly defined system, so, at this point CloudFormation will happily go back and destroy everything it had successfully made.
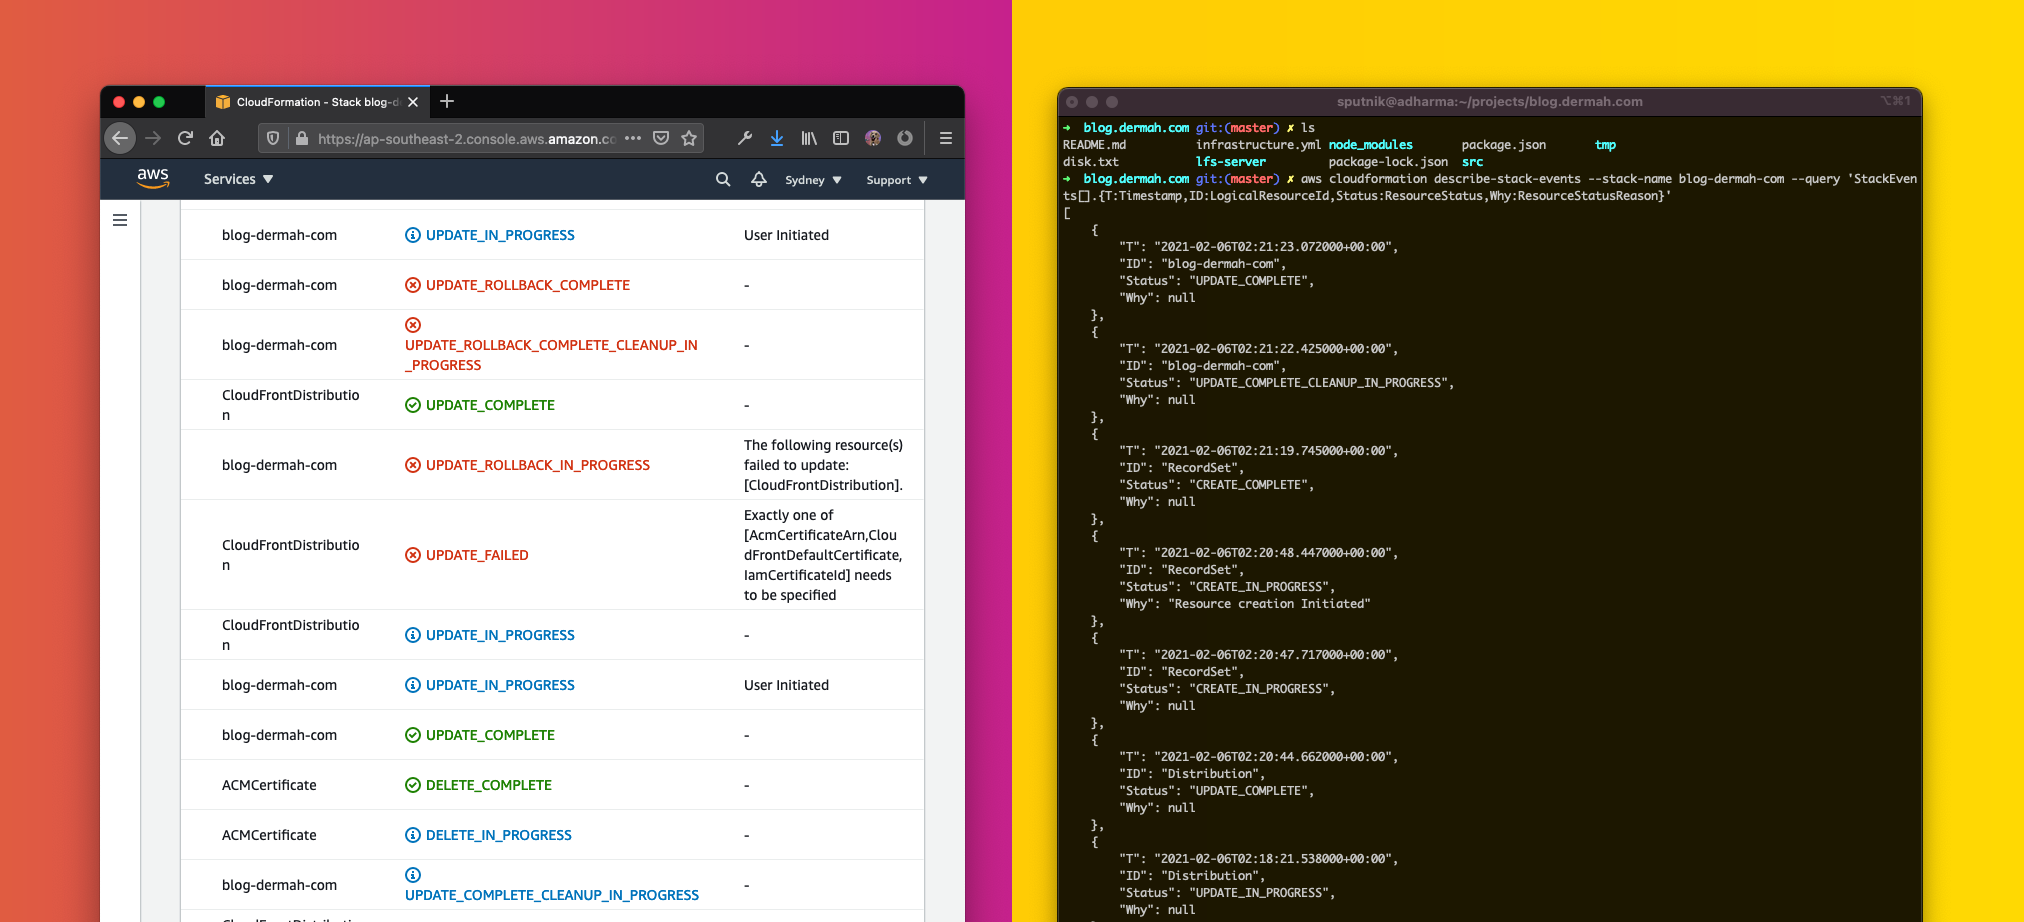
This especially sucks when you have things that take a long time to create and delete. CloudFront, for example, provisions infrastructure across the world simultaneously and can take quite a few minutes to create, update and delete.
Let's look at an example: the infrastructure stack for this blog you are reading is a good example of a slow to deploy stack. Here's a cut down example (in YAML format):
Parameters:
  DomainName:
    Type: String
    Description: Domain name to create resources for
  HostedZoneID:
    Type: String
    Description: >-
      Specify an existing HostedZone's ID to prevent creation of a new one.
      RecordSets for the Distribution will be created in it.

Resources:
  Bucket:
    Type: AWS::S3::Bucket
    Properties:
      # ...

  Certificate:
    Type: AWS::CertificateManager::Certificate
    Properties:
      DomainName: !Sub ${DomainName}
      # ...

  Distribution:
    Type: AWS::CloudFront::Distribution
    Properties:
      DistributionConfig:
        Aliases:
          - !Sub ${DomainName}
        DefaultCacheBehavior:
          TargetOriginId: S3Bucket
        DefaultRootObject: index.html
        Enabled: true
        Origins:
          - DomainName: !Select [1, !Split ["//", !GetAtt Bucket.WebsiteURL]]
            Id: S3Bucket
            CustomOriginConfig:
              OriginProtocolPolicy: http-only
        ViewerCertificate:
          AcmCertificateArn: !Ref Certificate
      # ...

  RecordSet:
    Type: AWS::Route53::RecordSet
    Properties:
      AliasTarget:
        DNSName: !GetAtt Distribution.DomainName
        HostedZoneId: Z2FDTNDATAQYW2
      Comment: !Sub Pointing to ${Distribution} CloudFront distribution
      HostedZoneId: !Ref HostedZoneID
      Name: !Sub ${DomainName}
      Type: A
When creating this stack, CloudFormation will do the following:
- First, create the Bucket and Certificate, because they don't depend on anything else
- Then, create the Distribution, because it depends on the Bucket (
!GetAtt Bucket.WebsiteURL) and the Certificate (!Ref Certificate) - Finally, create the RecordSet, becuse it depends on the Distribution (
!GetAtt Distribution.DomainName)
Depending on how you choose to validate your ACM Certificate, the Certificate creation can take a while. In some cases, you have to wait for an email from ACM to arrive, in other cases you have to wait for DNS to propagate. CloudFront has to deploy your changes all around the world, which used to take half an hour, but recently that's dropped down to a more manageable 5 minutes. This is much better but still annoying if you're sitting there mashing refresh or trying to deploy every few minutes.
Now, if it turns out you typed in the HostedZoneID wrong or something else goes wrong during the RecordSet create, CloudFormation will tell you what is wrong, then delete the Distribution, Certificate and Bucket you spent many minutes waiting for, wasting another bunch of minutes as it pulls back all the changes from around the world in CloudFront's case. What a pain!
This pain could have been mitigated by incrementally deploying parts of the stack, one by one. Add the Bucket to the template. Deploy. Add the Certificate. Deploy. Add the Distribution. Deploy... You get fast feedback while building your template without having to sit and wait as CloudFormation slowly undoes all your magnificent but incorrect handiwork.
Build up a README file of all your useful commands
As you get used to using the CloudFormation CLI, it will become handy to have commands you copy-paste over and over again written down in a standard location.
For example, if you're prototyping some infrastructure, you're going to be updating the CloudFormation stack a lot to test little changes. If you think you might ever need to run a command again in the future, put it in the README. It'll save you when it comes time to return to a long abandoned project, or it makes it feel safer when you need to destroy and recreate your stack.
Here's an example of some commands in the README file for this site. You don't have to have lots of explanation because you can reverse engineer the intent when you can see all the fiddly details.
Learn the right Properties for Resources with the Web Console
As I mentioned above, the first time you use a new AWS service, it is handy to try launching stuff with the web console. It often gives you sensible defaults as a starting point and can hint at what you do or don't need.
For example, if I need to create an RDS Instance, I'll sit with the RDS DBInstance Cloudformation Reference's 50 different configurable Properties and fill out just the Properties I need, by copying them from the web console launch wizard. Instead of hitting launch at the end of the wizard, I'll just deploy the stack that I wrote as I went a long.
YAML isn't that bad
Well, it does kinda suck, but you get used to it after a while. The thing that usually trips me up is indentation, and even a YAML linter can't catch every indentation problem. My best solution for this is validating a YAML stack using the CloudFormation CLI command very regularly. For example:
aws cloudformation validate-template --template-body file://infrastructure.ymlwhere infrastructure.yml is the name of the YAML stack file in the current folder. If there's a formatting issue, the CLI will quickly let you know which line it's on.
Diff command
If you want to see the difference between a template deployed in CloudFormation to the one saved to your disk, use a command like this:
aws cloudformation get-template --stack-name $STACK_NAME --query TemplateBody --output text | diff $STACK_FILE -where
$STACK_NAMEis the name of the stack deployed in CloudFormation$STACK_FILEis the name of the stack file on disk (e.ginfrastructure.yml)- Add
-C 5to the very end of the command to show 5 lines of context around the lines that have changed
Lines that start with < indicate what's deployed and > indicates whats on your disk.
This is a very quick way to see changes that you've made to a stack since you last deployed it, and can help to figure out what resources would update if you were to update the stack. It's also handy if it's been a while since you touched the project and you're not sure if it's up to date or not.
Yes, you could use a Change Set to get a definitive understanding of what will change, but this command gives you a quicker heads up on the command line.
You could also use git diff instead of diff to get some nicer (colourized) formatting:
$ aws cloudformation get-template --stack-name $STACK_NAME --query TemplateBody --output text | git diff --no-index - $STACK_FILE
diff --git a/- b/infrastructure.yml
index 0000000..9f8de69 100644
--- a/-
+++ b/infrastructure.yml
@@ -36,6 +36,8 @@ Conditions:
     !Equals [!Ref WWWRedirection, "true"]
   CreateTestInfra:
     !Equals [!Ref TestDomain, "true"]
+  CreateBucketPolicy:
+    !Equals [!Ref MakeBucketPublic, "true"]

 Resources:
   Bucket:
@@ -45,6 +47,7 @@ Resources:
         IndexDocument: index.html

   BucketPublicReadPolicy:
+    Condition: CreateBucketPolicy
     Type: AWS::S3::BucketPolicy
     Properties:
       Bucket: !Ref Bucket
Describe + Outputs + Query are powerful for other AWS CLI commands
Sometimes you want to use the AWS CLI to interact with the infrastructure you made in a CloudFormation Stack. You can use the describe-stacks operation and the AWS CLI --query option to get the Outputs from a stack, and use these in other commands. Then use $(...) (shell command substitution) and variables to make little useful scripts.
For example, I often want to use the AWS CLI to upload files to the S3 bucket I made in a stack. Here's a little stack with an S3 bucket and an Output containing the name of the bucket:
Resources:
  Bucket:
    Type: AWS::S3::Bucket

Outputs:
  BucketName:
    Value: !Ref Bucket
Note: the !Ref function returns a bucket's name
If you deploy this stack with the name bucket-stack, you can use this bash script to deploy files to the S3 bucket:
BUCKET_NAME=$(aws cloudformation describe-stacks --stack-name bucket-stack --query 'Stacks[0].Outputs[?OutputKey==`BucketName`].{V:OutputValue}[0].V' --output text)
aws s3 sync _build/ s3://$BUCKET_NAME
Some notes:
- In the first line, I'm setting the variable
BUCKET_NAMEto the output of the command in parenthesis. Try running just the command between the parenthesis, to see what it outputs. - I use the
--queryand--outputoptions to pull out just the relevant data from thedescribe-stacksrequest (i.e. theBucketNameOutput). Try running the command without these options to see the full command output. - In the second line, I use the
BUCKET_NAMEvariable in anaws s3 synccommand to copy a local folder (_build) to the S3 bucket defined in the stack.
This is one of those commands I keep on hand in my README because I use it all the time.
Hard code stuff, then refactor it out once it actually works
Another thing that comes from regular software engineering: get the code working first (badly if necessary), then refactor it until it's actually useful/clean/not garbage.
The same goes for Conditions and Parameters in your stack files. Don't bother trying to start with Conditional logic. Just hardcode values into your Properties so you can iterate and get your infrastructure up and running. Once you know it works, pull out things you might want to be configurable later into Parameters and Conditions.
This way of developing means you'll be debuging the underlying AWS service and your CloudFormation logic seperately. Doing both at the same time is too confusing!
And remember to use version control often and to your advantage!
Comments
Instead of building a comments section, I've offloaded that job to twitter. You can reply to this tweet about the post, or just tweet @Dermah.